Showing posts with label attic. Show all posts

4.29.2009

scratches & bruises


sometimes old-house renovation is hard. sometimes it results in scratches & bruises. sometimes these happen to your vehicle. so while trying to do some good to the house, some damage happened to chad's truck. this all happened a few months back, around thanksgiving actually.

basically chad was transporting 3/4" plywood sheets for our attic project in the back of his ford ranger. okay, okay - the sheets were larger than the bed of the truck and so...they came tumbling out at an intersection despite us doing similar stunts in the past and getting away with it. luckily some nice passers-by stopped to help him reload but there was some considerable damage done to the tailgate - as shown in the pictures above.

after months of searching craigslist, chad finally found a similar replacement for about $30.


12.29.2008

Insulation update

Take a moment to recall the movie Ghostbusters, more specifically near the end of the film where Dr. Peter Venkman (Bill Murray), Dr. Raymond Stantz (Dan Aykroyd), Dr. Egon Spengler (Harold Ramis) and Winston Zeddmore (Ernie Hudson) had to fight the Stay Puff Marshmallow Man to save New York City and all of mankind.

The Stay Puff Marshmallow Man is symbolic of our trials with insulating our attic space in two respects: First, in what seemed like a relatively easy (albeit labor intensive) job to get to the point where could have our attic foamed, we had to remove everything within the area in order to start with a "clean slate". In my mind I thought a couple of weekends and we should have it ready. What a joke! Referencing back to the symbolism of the movie: the thought of the Stay Puff Marshmallow Man as something evil seemed a bit off.

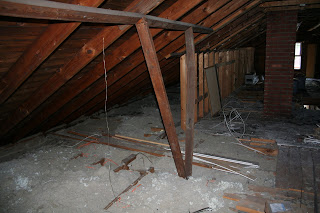
Below are pictures giving an example of what we started with. The attic was partially finished off in what appeared to be the mid to late 70's. It was not our style and therefore would need a certain amount of attention regardless. Add to the fact that the knee walls were further to the interior of the space than what we would like, it made sense to demo everything.

In this picture you are looking towards the east (or the back of the house) at the portion which was finished.


This view is towards the west (or the front of our house). This area was never finished which puzzled me as there were two additional windows that could allow light and fresh air in if needed.


The second reference to the movie is when the 'Busters were able to roast the Stay Puff Marshmallow Man. The two pictures below show the foam insulation installed, but not completed. After this picture, our contractor (Architectural Sprayers, Inc.) preformed an inspection of the foam and noted any areas that were either lacking in coverage or happened to shrink after being foamed.


The picture below shows one of the areas after being trimmed and marked after inspected.


This is of the same area after the deficient areas were addressed.


My next post will detail the specifics of how we modified the rafter areas to accept more insulation while also creating air channels to keep a positive air stream flowing from the eaves to the ridge of the roof. I will also explain why we undertook this project right now as well as detail a project which was also completed during this project that had proved elusive.......until now!

12.13.2008

ask and you shall receive


i already received my big item on my christmas wish list for this year. a new vacuum! yeah! this thing is awesome and supposedly the best for all hardwoods. thanks dad! i wonder if i can use this directly on the dog?

on other house topics. chad is finishing up on the attic. next weekend we'll have our insulation foamed-in. can't wait. it is a little chilly in here. thank God we have a fireplace!

11.03.2008

attic work, i've lost count


i used to number the posts related to the attic work but i've honestly lost count. so far this year we've unfinished the circa 1960 finished attic. we've ripped out, bagged up and sweated through removing countless truckloads worth of insulation. then we took a few months of any work on the house due to finances.

now the attic work is back on. yeah! which is how we were introduced to our friend, the hole. right now the house work is focused back on the attic as chad shop-vacs the cavities between the joists to make sure we get ALL the old nasty insulation outta there as well as the loose plaster keys.

we're set to have a quote from our insulation guys later this month. here's hoping all this work makes the less dust and cozy toes this coming winter!

10.26.2008

ah, my new friend, the hole.

i haven't written lately. that's because i hate this house. yesterday it had me in tears.
but enough about me!! i want to introduce you to our recent house guest. here's my new friend that decided to come and stay last weekend. it's called a hole. in our ceiling.

ahh, but please. don't worry about our new semi-permanent house guest (becuase let's be realistic here people. this thing could be a part of our lives for a long time) he decided to stake out his living quarters right next to his step-brother. whom we like to call "the place in our ceiling where we have exposed lath and no plaster."

yes, i think they will become good, good friends. lucky us.

7.01.2008

attic work progresses

before ... after ...

we were planning on finishing up the old insulation removal in the attic over the 4th holiday weekend. however the weather was so amenable on sunday that we decided to get up there and take care of it over this past weekend. although it was only in the high 70s outside, up in the dusty attic it probably was in the upper 80s. still we really couldn't have asked for better conditions given that it was the end of june in the midwest. as you can see from the 'before and afters' above, we're finished removing all the old insulation. YEAH!! what a great feeling. this took about four hours.

next steps - shop vac the bays and then install the ventilation stuff (sorry not technical, need chad for further explanation and official terms). then have the new insulation foamed in. so close!!!

6.13.2008

i've come a long way, baby

i really don't know why i used that title on this post. i'm been remiss in writing lately partly because i was in florida all last week and then have been swamped at work this week. but now...ahhh...it is the weekend so i can breathe a little easier now.

oh and both of our cameras are on the outs. i'm going to have to get a new one but just don't have the energy to think about it at the moment. so needless to say, not a lot of housework to talk about or to show which actually renders this post almost totally useless. however i didn't feel right disappointing my one reader (sorry about that tree Brian) so i thought i would post something.


here are some pictures of what i dream our attic bathroom will look like one day. not crazy about that sink, a little too grecian or something for my taste. but you get the general idea.

5.30.2008

cottage living design assistant

does any one else get stuck on cottage living's design assistant for a looooong time looking for house ideas? i used to have this picture above saved somewhere and i couldn't find it so i had to get back on their site to find it again. i am in LOVE with those painted wood floors and the beadboard walls & ceilings. this is what i would like our attic to look like when it is finished. i am going to refuse to have carpet installed. a major reason we cleaned out the attic is for improved indoor air quality. the last thing i want is all the chemicals used to make carpet seeping into my nostrils.
so then of course i started looking at kitchen pictures. i love this kitchen....well, not so much the mint-green cabinets. that color just doesn't do it for me but i adore the style of the cabinets and the 3x6 matte subs. and seriously? who doesn't love schoolhouse style lighting?

below is another picture of painted wood floors. i'm kind-of obsessed with the idea of having checkered flooring somewhere in the house as well as painted wood floors somewhere.

Posted by Picasa

5.29.2008

attic when we moved in ~ 2004

i didn't think we had any pics of what our attic looked like when we moved in. but i foud some! they are beeeee-autiful. see the nasty carpet and the paneling? gross.

Posted by Picasa

attic fun, days 2, 3 & 4

days two & three

pretty much more of the same on days two and three - just slowly removing the insulation from each cavity between the joists. the picture below is the entire north side of the attic behind the knee walls all finished.

day 4

day four was our final day off from work. we were really hoping to get all the insulation out by this day but unfortunately we did not. i think had we not tried to use that damn machine we would've accomplished our goal. oh well, you live & learn, right?

the picture below is the attic looking west, end of day 4. all cleaned out except for the middle section under the flooring. so, technically, there is probably another day of work ahead of us. ripping out the floor and then doing the same with the insulation under there. after that we're going to shop-vac the small stuff left behind.


cleaned out drop ceiling, end of day 4. this is interesting - under here is the pantry that is original to the house. ~
our final load at the dump. how cool is that trailer?


here is the load. disgusting. also - doesn't look like much, that's a whole days worth of work right there! of course, the insulation is compacted. i feel badly that we had to take this stuff to the dump because i do consider myself an environmentally conscious person. if you have a problem with this let me know, present your case and i'll gladly go ahead and defend our actions. otherwise, i'll just let it go. :)


so our next steps? finish taking out the old insulation, shop-vac and then contact the guys who foamed in the insulation last time. remember this?


attic fun, day 1

day one
during day one we removed all the batting, some of the larger pieces of paneling and wood that were just sitting around from previous demolition efforts and sucked up some of the wool & cellulose as was shown in the previous post. here are some pics of what the attic looked like after day one's work was completed.

attic from far end looking east, day one. you can see the closet framing & insulation batting are gone! really opens the space. ~


attic looking west, day one. batting removed from knee walls and ceiling. ~


now this is what we had to contend with. you can see the joists along the floor. we had to remove all that insulation by hand. good times. ~


below is the same space as the picture directly above just from a different angle. you can see what it looks like once we removed the insulation between the joists. you can also see where i gave up at the end of day one (the left hand side, i was supposed to go all the way to the planks in the middle of the room). i just couldn't take it the dirt, heat or dust any longer. ~


attic fun during memorial day weekend, the beginning

the beginning
every now and then for about a year and a half we've been demolishing the finished interior of our attic. it was finished by the son of the POs probably sometime in the 60s. there was gross mustard/tan colored carpet, wood paneling and a closet. there was also lots of insulation, which oridnarily is a good thing. chad began to deconstruct the attic when we updated the electrical work almost two years ago. ever since then the dust problem in our house went from somewhat annoying to down right disgusting - making me question the air quality in the house. so we decided to gut the "finished" part of the attic, take out all of the old insulation, have the foam insulation installed and eventually finish the attic off as a master suite. (after we figure out how to build permanent stairs to the attic, of course). the following posts chronicles our fun four days of removing the insulation in the attic.

we rented a trailer and a machine that blows in insulation. the thought was to try to reverse the machine so we could pump out the old insulation (wool & cellulose) into the trailer. ~

attic looking west, the beginning ~


attic looking east from far end, day 1. the wall with the batting insulation is the closet that separated the two "rooms" in the attic. the part we're standing in taking the picture was never finished. check out the light in the right hand corner. that is the orignal dining room light. ~


attic looking east from other side of closet, the beginning. this room was the finished room. the paneling and carpet were mostly long gone. ~

first we removed all the batting insulation you see along the walls. it was also installed along the "ceiling". this actually took a lot longer than i had anticipated. this day was nice outside but fairly hot inside at one point reading 90 degrees. later in the day we began to remove the wool & cellulose insulation in between the ceiling (the house ceiling, the attic floor) joists. this proved to be a not fun job and using the system with the hose didn't turn out as we had anticipated. this is because we couldn't actually use the hose to suck up the insulation, we were hoping to figure out a way to do this but it just wasn't there. so we had to carry loads of the insulation down the pull-down attic stairs and then dump it into the machine that sucked it through the hose out into the trailer. this ended up taking way too long and was SUPER messy. plus things would get stuck in the hose occasionally. we lost an entire hour because a tiny old metal tobacco tin got stuck and cause a back-up.

below is a picture of chad dumping a load of insulation into the machine on day one. by day two we figured out that this system was a complete waste of time and nixed using the machine. instead we just carried our loads to the trailer and dumped. much easier, much faster, much smarter. ~